
Blogging is a hobby enjoyed by millions, and if done well can earn a decent monthly income. The key to blogging is providing regular, useful content that people want to read. If you do this you’ll build a steady audience, and can start making good money from advertising. But first things first, you need to build the damn thing. So where do you start?
Which Blogging Platform?
First you need to decide which platform to use. There’s lots around, but the two biggest are Blogger and WordPress. Both are completely free and can be set up in minutes, but only WordPress offers a self hosted option, which can be found at WordPress.org. If you’re serious about blogging, then you’ll opt for a self hosted blog.
Hosted vs Self Hosted
This has been a debate for years among bloggers, but to me there’s only ever been one choice, and that’s self hosted. Why?
Hosted Blogs
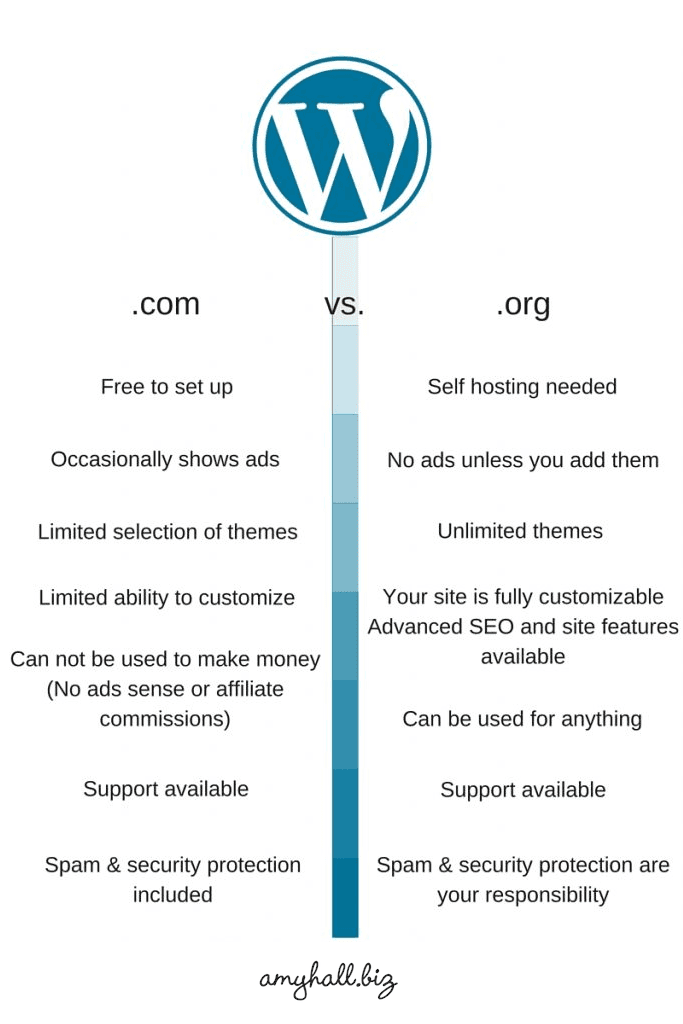
A hosted blog is a blog that’s hosted by the platform you’re using. You can easily set up a blog on Blogger, but it’ll always be owned by Google, as they host it. You’ll be given a domain name such as yourname.blogspot.com and can blog away to your hearts content. But you won’t have legal entitlement over the domain name. Wordpress offer hosted blogs in the same way, and you’ll be given a domain name such as yourname.wordpress.com, but they also offer a self hosted option on WordPress.org.
Advantages of a hosted blog:
No faffing around, just click and go.
Disadvantages of a hosted blog:
You don’t own it.
You can’t advertise on a WordPress hosted blog
Self Hosted Blogs
A self hosted blog is where you have your own domain name and get third party hosting. You can install WordPress on your own host, hence the name ‘self hosted’.
Advantages of self hosting:
You own it.
You can advertise or do whatever the heck you want.
Disadvantages of self hosting:
Costs a little bit of money.
Takes a little longer to set up.
For me it’s a no brainer, I’ve always opted for self hosted. Being in the SEO game I know how valuable a domain name can be. If you put that much time into blogging and accumulating links, you want to own the domain name, otherwise it’s a complete waste of time (in my opinion). And besides, WordPress is a much better platform than Blogger (also my opinion).
WordPress: The Experts Choice
WordPress started in 2003 and has grown into a phenomenon. It’s the most supported blogging platform in the world, with a range of plugins and versatility of style that makes it a supremely powerful platform. I originally chose Wordpress as it’s the most SEO friendly. But since then I’ve built around 90% of my websites using WordPress.
It works amazingly well as a stand alone website, let alone a blog, and I can’t praise it highly enough. If you’re smart you’ll use it to too.
Getting Started
Register A Domain Name
Hopefully by now you’re convinced to go with a self hosted WordPress blog. So where do you go from here? First things first you need a domain name. Personally I use a company called Internet.bs. I find the service excellent and domains some of the cheapest around. You might find other companies offering domains cheap for the first 12 months, but then they’ll hike up the price, and you’ll have to pay to go elsewhere. And whatever you do DON’T go to GoDaddy, or 123reg. Those guys seem friendly, but I’ve been burned more times than I care to mention.
Which TLD? .com, .org, .biz, .yadda, .yadda
TLD stands for ‘top level domain’ and is the extension of your domain name. Personally I prefer a .com. The way I see it, a .com is internationally recognisable and easy to remember. There may be less availability on a .com but it’s worth persevering. Don’t take the easy option and go for a .fj or something (which is Fiji by the way), just because it has your name available. At the time of writing it costs £6.07+vat per year to register a .com on Internet.bs. Simply sign up, fill out all your details, name, address etc, pay the money and you’re good to go.
Hosting
The next thing you’ll need is a host. There are literally millions of these, ranging from under £10 to over £1000 per year.
As you’re starting from scratch I’d recommend the bottom end of the range.
For this blog I use a company called Bluehost, purely because I’ve been with them since I started in 2006. They’re quite cheap, I pay around £100 per year for unlimited websites. You’ll only need hosting for one website I presume, so you could opt for one of the cheaper hosts.
Hosting is a big issue and I could write a full article on hosting alone (which I might!). But I find the cheaper hosts are okay if you have smaller amounts of traffic, which you will to start with. I can vouch for Bluehost as they haven’t caused many problems in the 9 years I’ve been with them. There’s been a few but you’ll get that with all hosts. If you want them to know more, check them out:
Nameservers
When you’ve selected and purchased your hosting you’ll need to change the DNS nameservers on your domain name. Your hosting company will give you the nameservers you need to use. In the case of Bluehost they’re: ns1.bluehost.com and ns2.bluehost.com. Just head back to your the registrar (where you bought your domain), login to your account, navigate your way to DNS or Nameservers, and add the nameservers you’ve been given. Simples.
Have A Break
At this point you can chill and relax (chillax). You’ll have to wait some time for your nameservers to propagate, so you can have some dinner, watch some TV and kick back for a bit.
Installing WordPress
Break time over! When your domain name has propagated and your hosting is all set up, it’s time to install WordPress. When you login to your host you’ll see the universal CPanel.
This is the control centre for hosting your website. You can set up emails among numerous other things, but most importantly you can install WordPress.
Somewhere near the bottom of the Cpanel you’ll find a section called ‘Software and Services‘. Some Cpanels have a direct link to install WordPress, others have something called ‘Softaculous‘. You click this and there’s a plethora of platforms waiting to install. WordPress is usually the top one. You simply click the button, follow the instructions and within minutes you’ll have WordPress installed on your domain. Simples.
Configuring WordPress
WordPress should be up and running on your domain name by now and you’re the proud owner of a self hosted WordPress blog. You’ll have a username and password that gets you into the Dashboard. The link to the dashboard is someting like: yourdomainname.com/wp-admin. You’re almost ready to start blogging, but first you need to configure your installation, before it’s picked up by the search engines.
First thing’s first, login and delete the Sample Page in Pages and delete the Hello World in Posts. You don’t want these getting indexed by Google. Also delete the sample comment by Mr WordPress and go to Categories and change the category from Uncategorized, to something meaningful like News or Latest.
Next go to Settings/Permalinks and change the Common Settings to Post name. This will provide SEO friendly URLs for your posts and pages.
Select A Theme
Go to Appearance/ Themes in the side menu and click the Add New button. Here you’ll get a mind boggling range of themes to choose from. You can go to popular, or featured, or do a search for something specific. There’s no doubt about it you’ll find something that you like. If you really want to be fancy you can hire someone like me to build you a unique theme tailored just for you. But it’s not essential. The theme is the icing on your cake and makes your website look nice. When this is done you can start concentrating your efforts on writing.
One More Thing: Menus
I thought I’d mention this because it’s a common mistake new bloggers can make. There is an option under Appearance/ Menus where you can create a custom menu. Make sure you do this because the default menu can cause problems with the layout of your theme. Simply create a menu, adding pages, categories or custom links and set it as your Primary Menu in the Manage Locations tab. You can create other menus to add in sidebars and things like that. But your main menu should have all the essential links to navigate your website.
With the basics done you can now start adding content to your blog in the form of posts and pages. If you’re using it as a website and want a static home page, then create a page called Home and a page called Blog. Go to Settings/Reading, and under Front page displays, select a static page. Select ‘Home’ as your front page and ‘Blog’ as your posts page. Of course if you want your latest posts to display on your home page, just keep it set to ‘Your Latest Posts’.
That’s The Basics Done!
Congratulations, well done, give yourself a pat on the back! To dive deeper into WordPress of course you’ll need some plugins. But I’ll save that for another post. For now sit back and relax in the knowledge, you’re the proud owner of a self hosted blog!
I’m always happy to answer questions or comments. I’ve been designing, building and promoting WordPress blogs for almost 10 years, so know a thing or two about them. Drop me a line and let’s cat. I mean chat!